In order to expand your understanding further and find out a vast wealth of possibilities, the following sites below all provide fantastic ideas regarding forest schools, outdoor education and how to engage with nature in both fun and meaningful ways.
Monday, 11 April 2016
Thirsty for more?
This blog only covers certain aspects of woodland science, but its intent is to not be a comprehensive guide but rather a taster into the endless possibilities that forest science can bring.
Water, water everywhere, but should we have a drink?
One of the few things that binds every member of the human race is that we all need water. Our bodies are made up of approximately 50-65% of water and every cell working within our body needs it to survive. Therefore, saying water is important to survival is quite an understatement. So what can you do if you find yourself in the wild woods without any clean water? This blog entry will discuss how to purify water and the science behind a process that will ensure the water you need to survive will not kill you.

So lets say that you are lost in the woods, your carefully rationed water has run out and you need to find more to survive. In the quiet of the woods you can hear a stream trickling nearby. As you finally find the little stream, you take a good look to see if the water looks clean. As it looks like normal clean water would you just stick your hands in, cup a healthy amount to quench your first and guzzle it down? No. Definitely not. The reason being that the vast majority of biological impurities in water are micro-organisms, bacteria and viruses that you will not be able to see with the naked eye. So to avoid these you'll need to gather some water into a pot and then place that over a fire to boil for around two minutes.
Although there are other options when trying to purify water, such as using carefully measured iodine or chlorine, it has been found that simply boiling water is the most effective way of removing these natural contaminants.
The reason this method is so effective is the fact that bringing water to boiling point (212°F / 100°C) will kill all pathogens, micro-organisms and such that are naturally in the water leaving it safe to drink, once it has cooled down of course.
This advice, however, must be taken with caution. Chemical contamination of water, such as oil slicks, pesticides and other such impurities will not be removed from boiled water and IS NOT SAFE TO DRINK!
Charcoal fingers can now be a thing of the past…
Most people can relate to the joy of using charcoal for
creative pursuits but what may stick out in some people’s minds is the terrible
mess it left on their fingers afterwards. This blog entry hopes to solve that
issue with a method of creating your very own charcoal pencil out in the woods
with very minimal preparation. This activity is popular with both children and
adults alike as it allows people to see a transformation take place before them
before being able to use the result themselves. When this activity is coupled
with the fascinating science behind it, it can become a valuable experience for
all involved.
Here is a list of what you will need to create your charcoal
pencil, the first three items you can scavenge in the woods but the others will
need to be brought:
- A fire
- Small willow or hazel sticks
- Small Elder wood sticks
- Potato peelers or knives
- Tent pegs
- An old metal paint or sweet tin
- Ensure the lid is tight fitting and create a hole in its centre approximately one cm in diameter
First off you must remove all the bark from the willow or
hazel sticks, this can either be done with a potato peeler or a knife. I find a
knife to be quicker and easier but a potato peeler is far more suitable for
younger explorers. Whilst this is going on, and it may take some time, an adult
should start a controlled fire ensuring it can hold the weight of a full tin of
sticks.
Once the sticks are bare and the fire is roaring, cut the
sticks so they can fit into your metal tin and ensure you put as many in as you
can so you can refill your charcoal pencil later! Then carefully place the tin
on top of the fire.
The process taking place inside the tin takes at least 45
minutes to complete, which provides ample time for you to regale your
companions with the science behind the changes and how sticks become charcoal.
As the bare wood becomes heated slowly within the tin it
becomes drier, water within the wood is evaporated. As the wood becomes hotter
the compounds of it begin to change and the process of gassification takes
place. During this process, organic materials convert into gasses such as
carbon dioxide.
The reason that the wood does not simply burst into flames
is due to the lack of oxygen present, the hole in the lid of the tin acting
only as a way for the gasses being exuded by the smouldering wood to escape.
Eventually the vast majority of organic compounds previously found within the
wood would have been burned away, leaving behind almost pure carbon in the form
of charcoal.
Once the tin is taken out of the fire and left to cool, the
elder wood sticks can be partially hollowed out by using a tent peg. Then
simply insert a cooled piece of charcoal and cut to size and voila, your very own
charcoal pencil is ready to be used!
The vicious tale of stinging nettles

Most people will recognise these marks as the calling card of the Urtica Dioica AKA the stinging nettle. This annoyance to many can be found in most forests around the UK, stinging unassuming ramblers for hundreds of years. This entry into the Woodland Science Guide will look closely (not too close obviously) at the common stinging nettle to understand why it is so effective in hurting us.
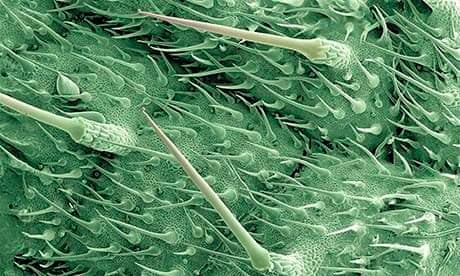
Here is an extreme close up of the surface of a stinging nettle leaf using a colour enhancing electron micrograph. As you can see, there is an incredible amount sharp hairs in this small section of leaf, all of which resemble a hypodermic needle. What may not be as obvious is that these hairs are actually hollow tubes. Due to the hairs having walls comprised of silica, essentially transforming the hair into a very sharp and easily broke needle. Much like a needle, the hairs will inject chemicals into whomever should be careless enough to snap it. Stored in a bulb at the base of the hairs, chemical such as acetylcholine and hydroxytryptamine are forced into the unsuspecting party, which can cause instant pain and discomfort. Accompanying this cocktail of fun is histamine, which brings on inflammation and can cause further discomfort in the form of a burning sensation.
Despite these damning traits, stinging nettles do have their uses. As cooking destroys their harmful chemicals, nettles can be used to make a nice soup that is rich source of iron and an invaluable source of vitamin C. Research is also being carried out into the possibilities of using nettles to relieve the painful symptoms of arthritis.
To sum up, although the plant can be painful to many unsuspecting people, we should hold off on the shears (for the moment at least) as it may be that the stinging nettles will help many people in years to come.
Science - Putting the Pop in Popcorn
Despite what many would have you believe, popcorn is not exclusively for dining on in a darkened room whilst watching the latest Hollywood blockbuster. Take a bag or two of corn kernels into the woods and with a little other preparation you'll be enjoying the warmth of a camp fire whilst eating your delicious popcorn in no time.
Before venturing into the woods, I would recommend buying two metal sieves and some metal wire. You'll then need to place them on top of each other with one of the handles bound to a long, sturdy stick and the other end of the sieves bound to each other. Confused yet? Here's a picture to clear up what I mean:

Now with your very high tech tool, all you'll need to do is hover the kernels above your camp fire, constantly shaking them so they do not burn and wait for the science to take over. Here is another opportunity to wow your friends by informing them of the science taking place and how those little kernels become yummy popcorn.
Almost every kernel of popcorn has a tiny drop of water stored within. When the kernel is slowly heated that water begins to expand. At around 100 degrees Celsius, the drop of water becomes steam, causing pressure to build within the kernel. The kernel continues to heat to 180 degrees Celsius, at which point the pressure inside the kernel becomes too much for the hull to take and it bursts open with its tell tale popping sound. The 'legs' protruding from the kernel is simple the expanded starch that was superheated by the ow evaporated water.
By the time you have explained that, you should find that your popcorn is ready to enjoyed under the stars. But if you want to impress even further, here is a video showing the reaction taking place in super slow-mo
Feeding the trees
6CO2 + 6H2O —> C6H12O6 + 6O2
Sounds simple, right? It's called photosynthesis and you better thank it because the reaction taking place there is effectively responsible for all life on this tiny blue dot we call Earth.
That might sound a touch dramatic but it is very much true. Photosynthesis is a process that not only provides the food for a plants growth, but also gives off nearly half of the oxygen found in our atmosphere- which is kind of a big deal.
But how does it work? Here is a very simple guide to the wonder of tree food:
- Light shines down upon the leaves of a plant, which uses the chlorophyll cells found in its leaves to trap the energy stored in the light.
- Water is absorbed by the roots of the plant and carried up to the leaves by the xylem inside the plant
- Carbon dioxide is also absorbed by the leaves, this time through the stomata.
- Now all the elements required photosynthesis to take place are available, the process begins.
- By using the energy from sunlight, the eaves are able to produce glucose from the carbon dioxide and water. This glucose feeds the plants and helps it grow.
- Another, and vitally important, part of this change is that oxygen is given off into the air as it takes place, allowing humans to live.
The image below gives a very simple description of the process of photosynthesis in plants, but for those who truly wish to push the boundaries of their understanding of this life giving process, check out the video HERE.

Flint and steel, lighting our world!
As mentioned in another entry into this blog, no overnight trip into the forest is complete without a roaring fire for weary campers to gather around. But what if you wish to avoid using the trappings of modern society by not using something such as a lighter to start the flames?! This entry into the Woodland Science Guide will provide you with the knowledge and understanding to start a fire using two simple items- flint and steel.

Using a piece of flint and steel to start a fire is not a new method by any means; for thousands of years, mankind has employed these two resources to start this precious source of heat light. Striking a piece of high carbon steel against a sharp edge of flint in the correct way will cause sparks to fly away from the steel, igniting the kindling of the fire. Although practice is required to perfect the technique of creating sparks this way, it proves as an invaluable method of starting a fire. Despite this, not many understand the curious nature of the science behind this process, something this blog seeks to remedy.
To truly unravel the reason why this technique produces sparks hot enough to start a fire, one must examine the nature of steel and more specifically,the iron within it. Known as an alloy, steel is a mixture of various metals and can be crafted into different strengths depending on its composition. To be an effective 'firesteel' the piece needs to be approximately 98% iron and 2% carbon. Although hard, this steel is relatively brittle and will provide the necessary level of resistance for iron particles to be struck of by the flint.

But what exactly causes the tiny fragments of steel to become hot enough to start a fire? Simply put, the steel rusts. As confusing answer as this is, it is perfectly true in that steel with a high amount of iron will rust when exposed to oxygen in the air. The iron within the steel oxidises immediately upon contact with the air, causing a thin layer of iron oxide to surround the unoxidised iron and preventing it from rusting further. This process, known as oxidisation, is a reaction that causes both the iron to rust and give off heat simultaneously.
As the thin layer of iron oxide is preventing the piece of steel from simply igniting fully, the heat given off is very limited and absorbed by the surrounding area, this is where the flint is needed.
When the steel is hit with the flint at an acute angel, small shards of the brittle steel will break away. Pieces of this steel would have been completely unoxidised prior to the flint striking it. As the smaller shard of steel has a larger surface area in relation to its size, it rust extremely quicker exuding a much more intense heat. Although the heat will taper off quickly, it is usually a higher enough temperature to provide a spark and get the average kindling ablaze.

Firesteels are used frequently today by seasoned outdoors men and women, their availability, reliability and low price making them an attractive tool when tackling the great outdoors. This method not only allows both children and adults alike the chance to understand and witness an aspect of science that is usually ignored, it also a worthwhile skill that can be a benefit to anyone.
Subscribe to:
Posts (Atom)